Tuesday, August 30, 2011

Zucchini Quesadillas

It is another busy week at Casa Eating Deliciously. Seems like everyone is trying to enjoy those last few days of summer vacation before Labor Day and the return of school. With all the out of town guests and weekday trips I need meals that are easy to prepare without compromising on taste. This recipe is quick and delicious with a bonus of using fresh vegetables and herbs that you might have hanging around in your garden.


Zucchini Quesadillas
recipe adapted from $5 Dinners

2 cups shredded mozzarella cheese
¼ cup shredded parmesan cheese
Handful fresh basil leaves, minced
Handful fresh parsley, minced
2 garlic cloves, crushed
1 pint grape tomatoes, quartered
1 red bell pepper, halved
1 large zucchini, halved
8 soft taco size tortillas

Heat the grill to medium heat. Lightly brush the red bell pepper and zucchini halves with olive oil.

Place the red bell pepper and zucchini halves flesh side down on the grill. Grill for about 5 minutes or until the vegetables have black grill marks. Remove the vegetables from the grill and let them cool slightly.

In a large bowl, combine the cheeses, basil, parsley, garlic, and cherry tomatoes. Dice the red bell pepper and zucchini and add to the bowl, stirring gently to combine. Spoon the mixture on one of the tortillas and cover with another tortilla. Repeat with remain tortillas and filling.

Place the tortillas on the grill for a few minutes on each side until the cheese is melted. Remove from the grill and let them cool slightly before cutting into triangles.

Wednesday, August 24, 2011

Snickers Cupcakes

You may have noticed that the majority of the recipes on this blog are savory. This is not because I don't like sweets. In fact, I have a huge sweet tooth! My fondest memories from college are not of classes or parties but of opening the mailbox to discover a 48 count box of full-sized Snickers candy bars sent from home. Now don’t go thinking I had no life and holed up in my dorm room with candy bars. The candy was great but the biggest joy was sharing all that sugary goodness with the amazing dorm residents, some of whom are still my closest friends today. When I saw a recipe for Snickers Cupcakes on Annie's Eats, I knew it would be the perfect dessert to share at our welcome to the neighborhood house warming party.

These cupcakes are not difficult to make but they are a little time intensive. I made the chocolate cupcakes, caramel sauce, and cupcake filling the night before the party. Allow the cupcakes to cool before storing at room temperature in an airtight container. Allow the caramel sauce to cool before storing in an airtight container in the refrigerator (do the same with the filling). Remove the sauce and filling from the refrigerator and allow to come to room temperature before proceeding with recipe. 

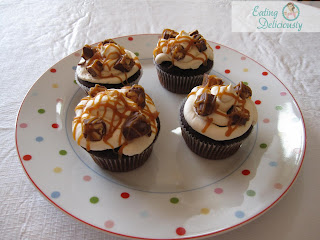
Snickers Cupcakes were a great way to introduce our family to the neighbors and hopefully our friends for many years to come.  


Snickers Cupcakes
as seen on Annie's Eats: cupcakes from Martha Stewart’s Cupcakes, caramel sauce from Ready for Dessert, frosting adapted from My Baking Addiction

Chocolate Cupcakes
½ cup Dutch-process cocoa powder
½ cup hot water
2 cups all-purpose flour
¾ teaspoon baking soda
¾ teaspoon baking powder
¾ teaspoon coarse salt
2 sticks unsalted butter
1½ cups sugar
2 large eggs plus 1 egg yolk
2 teaspoons vanilla extract
2/3 cup sour cream, at room temperature

Preheat the oven to 350°F. Line standard cupcake pans with paper liners. In a small bowl, whisk together the cocoa powder and hot water until smooth. In a medium bowl, whisk together the flour, baking soda, baking powder, and salt; set aside.

In a medium saucepan, combine the butter and the sugar over medium heat. Heat, stirring occasionally to combine, until the butter is melted. Remove the mixture from the heat and transfer to the bowl of an electric mixer fitted with a paddle attachment. Beat on medium-low speed, 4-5 minutes, until the mixture is cooled. Mix in the eggs and egg yolk, one at a time, scraping down the sides of the bowl as needed and beating well after each addition. Mix in the vanilla and then the cocoa mixture and beat until incorporated. With the mixer on low speed add in the dry ingredients in two batches, alternating with the sour cream, beating just until combined.

Divide the batter between the prepared cupcake liners, filling them about ¾ of the way full. Bake 18-20 minutes or until a toothpick inserted in the center comes out clean, rotating the pans halfway through baking. Allow the cupcakes to cool in the pan 5-10 minutes, then transfer to a wire rack to cool completely.

Caramel Sauce
1 stick unsalted butter, cut into pieces
1 cup sugar
1 cup heavy cream
¼ teaspoon vanilla extract
Pinch of salt

Melt the butter in a heavy-bottomed saucepan over medium heat. Add the sugar and cook, stirring occasionally, until the sugar begins to foam. It will look and smell like it’s on the verge of burning. Remove from the heat and add the heavy cream. Stir until the sauce is smooth (you may need to return it to the heat to smooth it out), then mix in the vanilla and salt. Let cool. (This can be stored in the refrigerator for up to 2 weeks.)

For the filling:
24 fun-size Snickers bars, chopped
1/3 cup Caramel Sauce

To fill the cupcakes, cut a cone out of the center of each cupcake with a paring knife. To make the filling, combine the chopped Snickers bars in a bowl with 1/3 cup of the caramel sauce, and mix to coat. Drop a spoonful of the filling mixture into each cupcake.

Caramel Frosting
2 sticks unsalted butter, at room temperature
1 pound box confectioners’ sugar
2 teaspoons vanilla extract
1/3 cup caramel sauce
Pinch of coarse salt
2 tablespoons heavy cream
8 fun-size Snickers bars, chopped for garnish

To make the frosting, add the butter to the bowl of an electric mixer. Beat on medium-high speed 1 minute until smooth. Blend in the confectioners’ sugar until smooth, 1-2 minutes. Mix in the vanilla, caramel sauce and salt until incorporated. (Note: the caramel sauce should be just warm enough that it is workable, but not warm enough to melt the butter in the frosting.) Add the heavy cream and whip on high speed until light and fluffy, about 3-4 minutes.

Transfer the frosting to a pastry bag fitted with a decorative tip. Drizzle the frosted cupcakes with additional caramel sauce and garnish with chopped Snickers bars.

Yield: 20 cupcakes

Only picture I have was taken with my cell phone

Sunday, August 21, 2011

Roasted Tomatoes with Pesto

Tomatoes fresh from the garden (or farmer's market) are my favorite summer treat. Just give me some coarse sea salt and a wad of paper towel and I'm in tomato heaven. With start of school right around the corner, comes the reminder that the summer produce season is quickly coming to the end. This is one of those recipes you can make in the dead of winter even with the less than flavorful tomatoes found at your local market. Roasting your tomatoes will improve their flavor and keeping a stock of Basil Pesto Pesto in your freezer will provide a little taste of the warmer weather to come. Since tomatoes are still in season I used some gorgeous beefsteak tomatoes I found at the farmer's market and served them alongside Roasted Asparagus and Green Bean Salad.


Roasted Tomatoes with Pesto
recipe courtesy of Ina Garten

6 large red tomatoes
3 tablespoons extra virgin olive oil
2 teaspoons dried oregano
Kosher salt
½ teaspoon freshly ground black pepper
½ cup Basil Pesto
½ cup freshly grated Parmesan cheese

Preheat the oven to 425ºF.

Core the tomatoes and then slice them across in ¼ inch-thick slices. Arrange the slices in a single layer on a sheet pan. Drizzle the tomatoes with the olive oil and sprinkle with the oregano, 1 ½ teaspoons salt, and the pepper.

Bake the tomatoes for 10 minutes. Remove them from the oven, spread each slice with pesto, and sprinkle with the Parmesan cheese. Return the tomatoes to the oven and continue baking for 10 minutes, until the Parmesan is melted and begins to brown. Using a flat metal spatula, put the tomatoes on a serving platter, sprinkle with extra salt, and serve hot, warm, or at room temperature.


Friday, August 19, 2011

Roasted Asparagus and Green Bean Salad

This light and refreshing salad is wonderful for those warm summer nights. If it is just too warm to turn on the oven, go ahead and fire up the grill. In a large bowl, toss the asparagus with the green beans, olive oil, lemon zest, ½ teaspoon kosher salt, and ¼ teaspoon black pepper. Grill the vegetables until lightly charred and cooked through. Remove from the grill, toss with the dressing and garnish with parsley. 


Roasted Asparagus and Green Bean Salad
original recipe by Eating Deliciously

pound asparagus, trimmed
1 pound green beans, trimmed
2 tablespoons extra virgin olive oil
Zest of 1 lemon
Kosher salt and freshly ground black pepper
2 tablespoons Lemon Honey Dijon Vinaigrette, recipe follows
1 tablespoon parsley, minced

Preheat oven to 425ºF.

On a rimmed baking sheet, toss the asparagus with the green beans, 2 tablespoons olive oil, lemon zest, ½ teaspoon kosher salt, and ¼ teaspoon black pepper. Spread into a single layer and roast, stirring occasionally, until the vegetables are tender, about 10 to 15 minutes.

Transfer the vegetables to a large bowl and add 2 tablespoons of the vinaigrette. Toss well and garnish with minced parsley. 


Lemon Honey Dijon Vinaigrette
recipe courtesy of Closet Cooking

¼ cup lemon juice
¼ cup extra virgin olive oil
1 tablespoon Dijon and/or grainy mustard
1 teaspoon grainy mustard
1 tablespoon honey
1 clove garlic, grated (optional)
¼ teaspoon salt
¼ teaspoon pepper

Whisk ingredients together in a small bowl until well combined.

Wednesday, August 17, 2011

French Country Omelette

This simple but sophisticated omelette is perfect for breakfast, brunch, lunch or even dinner. Instead of fooling around with fussy folding techniques, the omelet is finished in the oven and served directly from the pan.  You can even make this recipe for a crowd simply by using a larger pan. To avoid the breakfast rush, prepare the bacon and potatoes the night before and store covered in the refrigerator. Follow the directions below to add the filling to the top of the omelet before sliding the pan in the oven.


French Country Omelette
recipe slightly adapted from Ina Garten

3 slices thick-cut bacon, cut into ½-inch pieces

2 tablespoons unsalted butter, divided
1 cup Yukon Gold potatoes, peeled and cut into ½-inch diced
Kosher salt and freshly ground black pepper
4 large eggs
2 tablespoons milk
1 tablespoon fresh chopped chives
¼ cup shredded cheddar cheese

Preheat the oven to 350ºF.

Add the bacon to a 10-inch ovenproof omelet pan and cook for 3 to 5 minutes over medium-low heat, stirring occasionally, until the bacon is browned but not crisp. Take the bacon out of the pan with a slotted spoon and set aside on a plate lined with paper towel. Melt 1 tablespoon butter with the bacon fat left in the pan.

Place the potatoes in the pan and sprinkle with salt and pepper. Continue to cook over medium-low heat for 8 to 10 minutes, until very tender and browned, tossing occasionally to brown evenly. Remove with a slotted spoon to the same plate with the bacon. Pour the remaining fat out of the pan and discard. Return the pan to the stove over low heat.

Meanwhile, in a medium bowl, beat the eggs, milk, ½ teaspoon salt, and ¼ teaspoon pepper together with a whisk. Add the remaining tablespoon of butter and pour the eggs into the hot pan.

Sprinkle the bacon and potatoes evenly over the top and place the pan in the oven for about 8 minutes, just until the eggs are set. Remove the pan from the oven and sprinkle with the chives and cheese. Slide the omelette onto a plate and cut into wedges to serve.

Serves: 2

Monday, August 15, 2011

Lighter Chicken Marsala

You may have noticed that I do not include mushrooms in any of the recipes featured on the blog. I find the flavor and texture of mushrooms completely unappealing. I've tried making friends, mushroom caps stuffed with sausage and cheese...fail, mushrooms sautéed with garlic and wine...fail. Mushrooms and I are like water and oil, it doesn't matter what you try, we will never get along. The original recipe below contained 1 cup of sliced mushrooms that are added to the pan with the wine and stock. Good friends with mushrooms? By all means add them to this dish. If you have any mushroom recipes that you think will tempt me to the other side, feel free to leave them in the comments.


Lighter Chicken Marsala
recipe slightly adapted from Cooking Light

4 (6-ounce) skinless, boneless chicken breast halves
¼ teaspoon salt
¼ teaspoon freshly ground black pepper
2 tablespoons all-purpose flour
1 tablespoon olive oil
½ cup Marsala wine
½ cup chicken stock
2 tablespoons fresh lemon juice
1 tablespoon chopped fresh parsley
1 teaspoon cornstarch

Place chicken between 2 sheets of heavy-duty plastic wrap; pound each piece to ½ inch thickness using a meat mallet or rolling pin. Sprinkle both sides of chicken evenly with salt and pepper. Place flour in a shallow dish. Dredge chicken in flour, turning to coat; shake off excess flour.

Heat olive oil in a large skillet over medium-high heat. Add chicken; cook 3 minutes on each side or until browned. Remove chicken from pan; keep warm. Add the wine, stock, and lemon juice to pan; reduce heat, and simmer 10 minutes or until mixture is reduced to 2/3 cup.

Add 1 teaspoon of cornstarch to sauce to thicken. You can add additional cornstarch in ½ teaspoon increments to the sauce to obtain desired thickness. Return chicken to pan, turning to coat well. Cover and cook 5 minutes or until chicken is done. Sprinkle with parsley.

Saturday, August 13, 2011

Garlic Butter Burgers

One of my favorite local restaurants is a kitschy 50's style diner that is best known for its giant hand-poured malts, milkshakes, juicy cheeseburgers, and crisp French fries. I love a good burger and I have had little success making them at home. When Bobby Flay’s Burgers, Fries, and Milkshakes book was published I was thrilled, the title alone had me drooling. I located a copy at the local bookstore and flipped through the pages. After a few minutes I had mentally bookmarked so many recipes that I knew the book was coming home with me that day. Chef Flay doesn’t like “meatloaf burgers” and uses certified Angus chuck seasoned with salt and pepper. The classic burger is elevated by his creative use of condiments. Below is the first recipe I tried from the book and it was fantastic! No longer will I have to make the trip to my favorite diner to enjoy a delicious burger.


Garlic Butter Burgers
recipe slightly adapted from Bobby Flay's Burgers, Fries, and Shakes

12 tablespoons unsalted butter (1 ½ sticks), slightly softened
4 cloves garlic, minced
½ small shallot, minced or grated
3 tablespoons chopped fresh flat-leaf parsley leaves
Kosher salt and freshly ground black pepper
1 ½ pounds ground chuck
1 ½ tablespoons canola oil
4 hamburger buns; split; toasted if desired

Combine the butter, garlic, shallot and parsley in a food processor and process until smooth; season with salt & pepper to taste. Scrape into a bowl, cover, and refrigerate for at least 30 minutes to allow the flavors to meld. The butter will keep in the refrigerator for up to 24 hours. Bring to room temperature before using.

Divide the meat into 4 equal portions. Form each portion loosely into a 1-inch thick patty and make a deep depression in the center with your thumb. Brush the buns with about 4 tablespoons of butter.

Preheat a grill or grill pan over medium-high heat. Season both sides of each burger with salt and pepper and brush with the garlic butter.Cook the burgers, turning once and basting with the remaining garlic butter.

Meanwhile, toast the buns on the grill for a few minutes. Place the burgers on the bun bottoms, cover with the bun tops, and serve immediately.

Cooks Note: I separated the garlic butter used for brushing the burgers into a small bowl. As a result, I had plenty of leftover butter that I was able to freeze for later use. Try the garlic butter as a topping for pasta or vegetables, or just slathered on a piece of bread. Yum!

Thursday, August 11, 2011

Rustic Tomato-Basil Tart

I got a little carried away with the heirloom tomatoes at the farmers market this week. In an effort to use some of them up, I tried this recipe found in an old issue of Cooking Light Magazine. I used half red heirloom and half yellow heirloom tomatoes but you can use regular tomatoes and all red ones if yellow are not available. If you have a bounty of tomatoes either from the market or right from your own garden you will definitely want to give this tart a try.


Rustic Tomato-Basil Tart
recipe courtesy of Cooking Light Magazine

1 ½ pounds medium yellow tomatoes, cut into ¼-inch-thick slices
1 ½ pounds medium red tomatoes, cut into ¼-inch-thick slices
1 ½ teaspoons salt
1 cup fresh corn kernels (about 2 ears)
1 tablespoon fresh lemon juice
3 tablespoons fat-free sour cream
1 ½ cups plus 2 tablespoons all-purpose flour
¼ cup plus 1 tablespoon yellow cornmeal
¼ cup chilled butter, cut into small pieces
½ cup fresh basil, thinly sliced
1/3 cup shredded fontina cheese (1 ½ ounces)
1 tablespoon fresh oregano, chopped
¼ teaspoon cracked black pepper

Arrange tomato slices in a single layer on several layers of paper towels; sprinkle with ½ teaspoon salt. Let stand 20 minutes; blot dry with paper towels.

Preheat oven to 400ºF. Place corn, juice, and sour cream in a food processor or blender; process until smooth. Combine 1½ cups flour, ¼ cup cornmeal, and ½ teaspoon salt in a large bowl; stir with a whisk. Cut in butter with a pastry blender or 2 knives until mixture resembles coarse meal. Add corn mixture; stir until a soft dough forms. Knead gently 3 or 4 times.  

Slightly overlap 2 16-inch sheets of plastic wrap on a slightly damp surface. Place dough on plastic wrap; press into a 6-inch circle. Cover with 2 additional sheets of overlapping plastic wrap. Roll dough, still covered, into a 14-inch circle; place on a large baking sheet in freezer 10 minutes or until plastic wrap can be easily removed. Line baking sheet with parchment paper; sprinkle paper with 1 tablespoon cornmeal. Remove 2 sheets of plastic wrap from dough. Place dough, plastic wrap side up, on baking sheet. Remove top sheets of plastic wrap.

Combine ¼ cup basil, cheese, and oregano. Combine 2 tablespoons flour and ¼ teaspoon salt. Arrange cheese mixture on dough, leaving a 1 ½-inch border. Using a sifter or sieve, sift 1 tablespoon flour mixture over cheese mixture.  Arrange half of tomatoes over cheese mixture. Sift remaining flour mixture over tomatoes; top with remaining tomatoes. Fold edges of dough toward center; press to seal (dough will only partially cover tomatoes). 

Bake at 400ºF for 35 minutes or until crust is brown; let stand 10 minutes. Sprinkle with ¼ cup basil and pepper. 

Yield: 6 wedges


Tuesday, August 9, 2011

Herbed Chicken on Vegetable Confetti

Here is a meal that is perfect for using the abundance of vegetables that crop up in home gardens or farmers markets during this time of year. The the moist and flavorful chicken is the perfect compliment to the fresh tender vegetables.


Herbed Chicken on Vegetable Confetti
recipe adapted from Premeditated Leftovers via $5 Dinners

Vegetable Confetti
2 tablespoons olive oil
1 cup red bell pepper, cut into thin strips
2 cups zucchini, julienned
2 cups yellow squash, julienned
1 cup onion, diced
4 cloves garlic, minced
2 tablespoons fresh basil, shredded

Heat the olive oil in a large skillet or wok. Add the peppers, squash, zucchini, onion, and garlic. Sauté for 3 minutes over a medium high heat. Reduce heat to low and add basil. Cook on low for 7 to 10 minutes until the vegetables are tender.

Herbed Chicken
1 pound thin-cut boneless, skinless chicken breasts
1 teaspoon garlic powder
1 teaspoon onion powder
½ teaspoon salt
½ teaspoon pepper
1 teaspoon poultry seasoning
1 teaspoon smoked paprika

Preheat a grill to medium high. Combine the spices on a large dinner plate. Dredge each chicken breast through the spices, turning to evenly coat both sides. Grill the chicken, turning once, for 8 to 10 minutes or until chicken is cooked through and juices run clear. Cut each breast into thin slices and serve on Vegetable Confetti.


Saturday, August 6, 2011

Cream Cheese Pound Cake

If you are a pound cake fan than this recipe is for you. When a picture of this recipe popped up on Facebook I knew I had to give it a try. Since I am on a grilling kick as of late I grilled each cake slice before serving. Simply brush each side of the sliced cake with melted butter and place on the grill for 1-2 minutes, turning once until grill marks appear. I served the cake alongside sliced strawberries macerated with a little sugar and lightly sweetened whipped cream.


Cream Cheese Pound Cake
recipe courtesy of My Baking Addiction originally adapted from Allrecipes 

1 (8 ounce) package cream cheese, softened
1 ½ cups butter, softened
zest of 4 lemons
3 cups granulated sugar
6 large eggs
3 cups all-purpose flour
1 tablespoon vanilla extract

Preheat oven to 325ºF. Grease and flour a 10 inch bundt pan.

In the bowl of a stand mixer, fitted with the paddle attachment, or with a hand mixer in a large bowl, cream the butter and cream until smooth.

In a medium bowl, combine the sugar and lemon zest and mix together with your fingertips until the sugar is moistened and fragrant. Add the sugar mixture gradually to the butter and cream and beat on medium speed until light fluffy, about 3 minutes.

Add eggs two at a time, beating well with each addition. Add the flour all at once and mix in. Add vanilla and mix thoroughly.

Pour into prepared pan. Bake at 325 degrees F for 1 hour and 20 minutes. Check for doneness at 1 hour. A toothpick inserted into center of cake will come out clean.

Store cake at room temperature in an airtight container for up to 3 days.


Thursday, August 4, 2011

Warm Flank Steak Salad

Salads are often the main entree on our dinner table during the warm summer months. I dislike heating up the house and prefer a lighter meal when the temperature soars ever higher. My family enjoys this practice but I always fear that dinner guests will be disappointed they are not eating the requisite burgers and hot dogs. This steak salad is the perfect combination and won rave reviews from everyone at our recent dinner party. Instead of adding tomatoes to the salad I opted to serve this with Tomato Crostini.


Warm Flank Steak Salad
recipe adapted from Food Network

2 tablespoon extra-virgin olive oil
1 flank steak, about 2 pounds
Kosher salt and freshly ground black pepper
2 cloves garlic, minced
¼ cup red wine vinegar
2 tablespoons chopped fresh oregano or 1 teaspoon dried oregano
2 tablespoons unsalted butter
2 teaspoons Dijon mustard
16 ounces baby spinach
Shaved Asiago or parmesan cheese

Heat the grill to medium heat and season both sides of the steak with salt and pepper. When the grill is hot, add the steaks and cook, turning each once, about 6 minutes per side for medium-rare. Transfer the steaks to a plate and cover with aluminum foil.

Heat the olive oil in a large skillet over medium heat. Add the garlic to the pan and cook, stirring occasionally, about 1 minute. Remove the skillet from the heat, add the vinegar, and use a wooden spoon to scrape up any brown bits from the bottom of the pan. Whisk in the oregano, butter, Dijon mustard and any juices from the steak, until the butter melts. Add the spinach to the skillet, season with salt and pepper, and toss until the greens begin to wilt, about 30 seconds, Remove from the pan and divide evenly between 4 plates.

Slice the meat against the grain into thin slices, place on top of the spinach.  Add the pan dressing and shaved cheese. 

Tuesday, August 2, 2011

Tomato Crostini

This appetizer is a great way to use the abundance of fresh tomatoes popping up in your garden. I have even used a can of diced tomatoes, well drained, in place of the fresh tomatoes when they are out of season.  In the summer, I toast the bread on the grill for a hint of char and a touch of smoky flavor. If capers are new to you, please give them a try. They add a wonderful salty bite that won't overwhelm the flavor of the tomatoes.


Tomato Crostini
recipe adapted from MyRecipes

1 French baguette, sliced into ½-inch pieces
Cooking spray
2 cups chopped plum tomatoes
4 tablespoons chopped fresh basil
2 tablespoons capers
2 teaspoons balsamic vinegar
2 teaspoons olive oil
½ teaspoon sea salt
freshly ground black pepper
1 small garlic clove, finely minced
1 large garlic clove, halved

Preheat oven to 375ºF.

Combine tomatoes, basil, capers, vinegar, olive oil, salt, black pepper, and minced garlic in a small bowl; set aside.

Lightly coat both sides of bread slices with cooking spray; arrange bread slices in a single layer on a baking sheet. Bake at 375º for 4 minutes on each side or until lightly toasted.

Rub 1 side of bread slices with halved garlic; top evenly with tomato mixture.